Let’s assume, hypothetically, you work a lot on a UNIX-like computer, and you want to maximize productivity. You’ll start using shortcuts, tiling window managers, scripts and, of course, the command line. Let’s also assume that your brain is that of a human. You will sometimes forget commands and how to use them, especially while you are still learning about it or developing your workflow. Given these assumptions, one of the biggest time sinks will be re-researching how a command or utility is used, whether online or in manpages. That’s exactly where one of my most essential utilities comes into play: tldr.
How tldr works
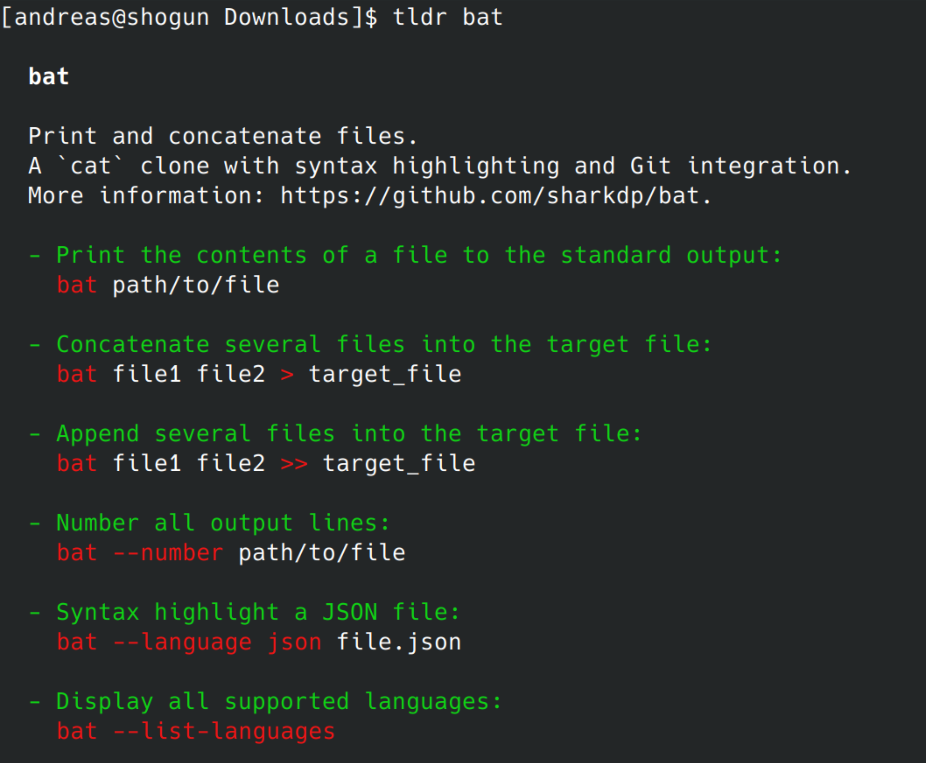
Once installed, TLDR is as easy to use as it gets: Forgot how to use bat or ncdu?
tldr bat
tldr ncdu
From now on, this is the only command you have to remember for basic usage of about 90% of all command-line tools. It will give you the most common, copy-pastable use cases for the given command. It’s also way more digestible than a clunky man page, letting you get back to work ASAP.
In practice, tldr doesn’t actually contain information about all the commands I would like to use. A significant number of times it has prompted me to contribute instead. Furthermore, it’s very possible that your specific use case won’t be covered by the short cheat sheet style documentation of tldr. This however is by design and part of what makes it so essential. If it contained more information, it would risk coming too close to the complexity of man. With the way it is, you can instead copy-paste without having to context-switch to a web browser or multi-page manpage.
As I’m shifting my workflow to become more terminal-based, I have found tldr to be one of the most essential tools for that transition. Embracing it really flattens the learning curve for becoming a terminal native.
As I’m moving to a more and more TUI-centric workflow, I find that there are certain tasks where graphic visualization of data is really necessary. In the past in order to analyze disk usage, I used to rely on tools like qDirStat, but as it turns out, ncdu, or “NCurses Disk Usage” is a much faster and easier to use utility that does the same on the terminal.
Ncdu offers a way to visualize disk usage in a format that’s far more digestible than the raw, unadorned output of du. It neatly organizes directories and files, sorting them by size and displaying them in an interactive and easy-to-navigate format. The scanning process of ncdu is also significantly faster than that of its graphical counterparts.
ncdu: Working intuitively and with sane defaults
Similar to bat, ncdu is built to function optimally without much tweaking. Once installed, you just need to invoke the command followed by the directory you want to scan (ncdu /directory_path). If no directory is specified, ncdu assumes the current directory. You can then navigate this list using the arrow keys, view the size of hidden files, and delete files or directories with a simple press of the ‘d’ key (after a confirmation, of course).
While ncdu works well out of the box, it’s not a one-size-fits-all tool. It provides a set of options that let you customize its behavior according to your preferences:
--si: By default, ncdu uses base 2 prefixes (KiB, MiB, GiB) for sizes. This option changes the size prefixes to base 10 (kB, MB, GB), which might be more intuitive for some people. --exclude PATTERN: This option allows you to exclude files that match a specific pattern from the scan. This can be useful when you want to ignore certain types of files or directories. -r: Read-only mode. Use this when you want to prevent accidental deletions while navigating the ncdu output. --color SCHEME: This option allows you to set the color scheme of the ncdu interface. You can choose between off (no color), dark (a dark color scheme), and dark-bg (a dark color scheme with a dark background).
Current image generation AI is amazing, and Stable Diffusion is one of the best models available. It is capable of generating excellent quality images and because it is open source, you can run it locally which means there are no privacy concerns or additional costs involved with using it. Just a few days ago the newest and most powerful version yet, Stable Diffusion XL 1.0 was released which works better at higher resolutions of 768×768 to 1024×1024. With some extra steps you can set it up and use it today with stable-diffusion-webui, an easy to use tool you can run locally and use in your browser to play around with various models. This is how to set it up in just 10 minutes:
stable-diffusion-webui setup
First, if you have an Nvidia GPU, make sure you have the latest proprietary driver. You need it in order to make use of CUDA for acceleration of Stable Diffusion.
Installing python3
First you will need to install python3 if you don’t already have it. I won’t get into too much detail on this because there are thousands of guides for this, but the easiest way is to use a package manager:
For Windows 11: Run winget install -e --id Python.Python.3.11 in the Windows terminal
For Arch Linux: Run sudo pacman -S python
For Ubuntu: It should already be installed on modern versions
Running python -V should now yield a 3.x version number.
Install stable-diffusion-webui
Next we are going to download and install stable-diffusion-webui which we are later going to use to interact with Stable Diffusion. As of now support for Stable Diffusion XL has not yet been merged into the master branch so we are going to use the dev branch.
If you don’t have git, you can download the current dev state here: stable-diffusion-webui If you do have git however, I recommend that you properly clone the repository. This way you can later update more easily: git clone https://github.com/AUTOMATIC1111/stable-diffusion-webui.git git checkout dev
Download Stable Diffusion XL models
stable-diffusion-webui comes with Stable Diffusion 1.5. If you want to use the improved Stable Diffusion XL model, you will need to download it separately and place it in the directory stable-diffusion-webui/models/Stable-diffusion You can get the base model from here: Base Model And the optional refiner model from here: Refiner Model
Running the webui and usage
Now you can run the webui. Simple start webui.sh if you are on Linux or webui.bat if you are on Windows. It may download and install some dependencies on your first launch, but when it’s done, point your web browser to http://localhost:7860/ and you should see the webui.
At the top left, make sure you select the XL base model. If you are using Stable Diffusion XL, make sure your resolution is between 768×768 and 1024×1024 or quality will be poor. Higher resolutions will take longer to generate but look sharper. You can also play with the number of sampling steps and sampling method which can influence the final result significantly. Generally, 20-60 steps are good values and the sampler “DPM++ SDE Karras” should yield very good result. You can learn more in this excellent comparison: https://stable-diffusion-art.com/samplers/#Evaluating_samplers You can move the CFG slider to influence how creative the model should interpret the prompt. A lower value may lead to less literal, more creative results. Next, just enter a prompt and hit generate. If you encounter any issues, make sure to read the next section.
Finally, if you have installed the refiner model, you can send your generated image to the img2img section. There you can switch to the refiner model to apply modifications and tweaks to the original image. For example, you can change the subject or art style after you are happy with the basic composition.
Optimizing performance and troubleshooting
Here are some tips for improving performance: If you are on Linux, installing TCMalloc may improve generation speed, for example: sudo apt install --no-install-recommends google-perftools If you are using CUDA, running with xformers should speed things up further: webui.sh –xformers If you are running low on VRAM and experiencing crashes, try this option to save memory at the cost of speed: webui.sh --medvram And finally, if you are generating black images, try this option: webui.sh --no-half-vae
Examples
Here are some cool images I was able to generate using Stable Diffusion XL:
Considering how popular and powerful it is, I am surprised it took me this long to find this tool I never knew I needed: Bat is a powerful command-line utility that provides a modern and feature-rich alternative to the traditional Unix “cat” command. It also to a lesser degree can replace less/more.
Syntax highlighting
One of the headline features of Bat is syntax highlighting. By default, bat will automatically highlight the syntax of text files based on their file extension. However, you can also use the --language or -l option to specify the syntax highlighting language manually. For example, you can use bat -l python to highlight a Python script, or bat -l html to highlight an HTML file:
bat -l python script.py
In practice though, the automatic detection (probably not based on magic since there is an option named --ignored-suffix?) has so far worked perfectly fine. You can use bat -L to view a list of all supported syntaxes.
Sensible defaults
That brings me to the other thing that bat does that to me is a huge time saver: It just works. Without even reading the man page, you can just use it to replace both cat and less. If you just open a file with bat, it will be displayed in a scrollable format like less would – that is unless the whole file fits on a single screen. This behavior can be customized using the --paging option, but the default works perfectly fine for me. If you pipe the output of bat somewhere else, it will just behave like cat. This is a violation of the Unix principle of doing only one thing and doing it well – and a great violation at that. The default style also just works but…
Styles
Bat supports styles which modify general behavior. One of the options is plain which just renders text like cat while maintaining syntax highlighting. Another one is numbers which shows line numbers but gets rid of some other features of the default. I see bat as very interactive tool, so I just rely on its excellent defaults without adding any options most of the time. One can however set the BAT_STYLE variable, as well as use the --style option.
Themes
Bat supports themes: --list-themes lists them and BAT_THEME or --theme sets them. Unless you are into ricing, you can probably ignore them though.
Ranges
Bat has also pretty much replaces head and tail for interactive use for me. By using the -r option one can easily get any section of a file without piping or remembering multiple options or commands:
'-r 30:40' prints lines 30 to 40
'-r :40' prints lines 1 to 40
'-r 40:' prints lines 40 to the end of the file
'-r 40' only prints line 40
'-r 30:+10' prints lines 30 to 40
Git integration
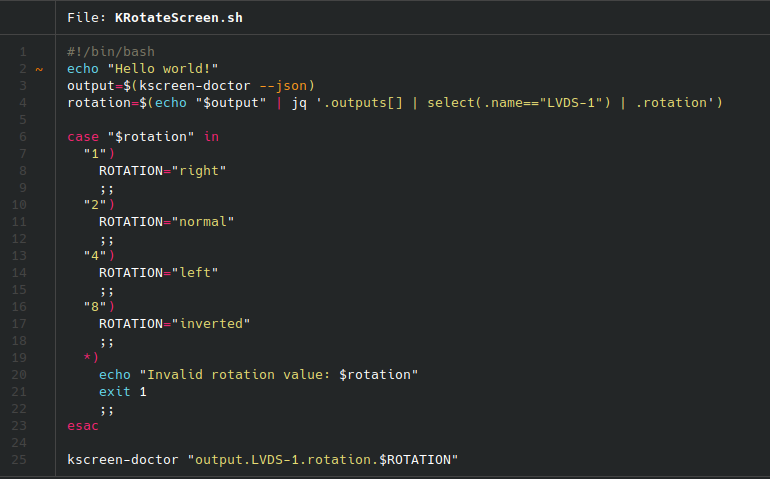
This is another feature I love – bat automatically recognizes when a file is part of a git repo and will highlight changed lines!
It just works
Such a time saver!
Miscellaneous bat features
Bat has a number of further features that you can learn about from the man page. However there are a few more I want to briefly mention:
-A prints all characters visibly, even whitespaces.
-H highlights a block of text with the same syntax as -r.
-p is an alias for the plain style.
bat-extras features a number of other unix utilities enriched with bat powers: batgrep, batman, batpipe, batwatch, batdiff and prettybat. Definitely check these out as well.
For several years my photo editing workflow went something like this:
Take a picture, RAW+JPEG.
Plug SD card into my PC.
Import it into Lightroom Classic CC, lossless conversion to DNG.
Occasionally LR backs up its catalog.
Windows File History backs them up to my NAS.
A script backs them up to LTO-4 tapes.
I’ll browse through my catalog and flag the ones I think are good enough to edit.
I apply the LR auto adjustments and tweak them a little to see how far I get.
Now I can start cropping, editing, correcting and applying filters with the Nik collection.
The finished product is then exported to Google Drive and then shared to to social media.
If I’m not home I don’t have a proper workflow, meaning I often create redundant backups or have difficulties finding specific pictures.
This comes with a few problems:
It’s pretty darn complicated. I wish I could cut out a few layers of complexity.
I have to use proprietary software that doesn’t run well under Linux, so I can only use this workflow when I’m at home.
It costs quite a bit of money. Even with a student discount, LR Classic CC costs at minimum 12€ per month.
Lightroom performance is horrible. Lightroom CC is lacking basic features and I don’t want to upload everything to the cloud.
I use hardly any Adobe specific features. Automatic lens corrections aren’t that important, I can live without the Nik collection.
I solved some of my issues with the following workflow:
Regardless of whether I’m at home or travelling with my linux laptop, I’m now using Darktable with the “local copies feature” to avoid redundant backups.
I’m keeping the “two tier” storage system. All photos in their raw form are at some point imported through darktable into my central NAS, but all finished pictures are stored on my Google Drive. This means I can always access my most important data quickly even if it comes from outside my main workflow (e.g. edited on my phone…).
The actual editing can take place in Darktable, RawTherapee, Snapseed or Lightroom Mobile. If I’m on a computer the data will still go through Darktable and then to my NAS and also be exported to Google Drive, otherwise it will directly go to the Drive.
I avoid the cost of Adobe products. The initial migration to this new workflow was pretty quick, and now 99% of the time I can use one path for everything.
The actual editing results for me are comparable to what I could achieve with Lightroom.